|
| |
Gallery: Hobby Workshop &
Garage Machine Shop Construction |
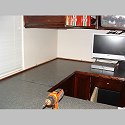
Several months after moving
into our new home, I was finally able to start building my
hobby workshop room. Both my wife & I agreed that
we did not want to ever have to move again, so I wanted something
very permanent. I've tried to keep up with photos, so
that hopefully someone might be inspired by my work or gain
some ideas for their hobby workshop. My hobby room was
a spare bedroom, converted into my workshop; it measured approximately
14 feet by 12 feet, with 9-foot high ceiling. I wanted
to maximize my storage space for all of my model kits, as
well as other hobby-related items (full-size & mini football
helmets and facemasks; and of course, my G-scale trains and
supplies).
I started off by removing the carpet in the room & closet,
and my brother-in-law installed Brazilian Cherry laminate
wood flooring; this way, any model parts or pieces that fall
on the ground can be easily located. I retained the
original baseboards, Wainscoting, and crown molding, as these
would all be hidden by the cabinets and did not interfere
at all with their installation. Also, in the VERY unlikely
event that I ever had to convert this workshop back to a bedroom,
at least all I had to do was to fill screw holes and touch-up
paint, once the cabinets were all removed.
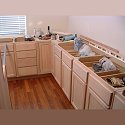
I bought unfinished Oak cabinets for the floor units from
Lowes (14 units total), and stained them Red Mahogany once
installed. I decided to build my own countertops with
Formica laminate and 5/8-inch particle board, reinforced with
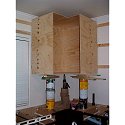
steel angle and tubing. Then, I started building my
own wall cabinets/shelves from 3/4-inch finish-grade plywood,
as I wanted the wall cabinets to maximize the available space
and cover the entire walls (360-degrees!). Each large
corner cabinet and each large wall cabinet has adjustable
shelving inside, which I drilled myself. I did leave
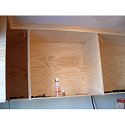
about 3-inches of space between the tops of the wall cabinets
and the ceilings, to allow the installation of crown molding
and to allow wires to be run along the tops of the cabinets
without being seen; I pre-wired the room for my old home theater
surround-sound system, which will be updated with an LCD TV.
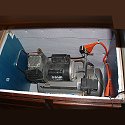
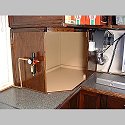
I insulated one of the bottom cabinets to house my old 11-gallon
air compressor, and installed copper
piping from the air compressor up
to the spray booth for my airbrush. I also installed
a moisture trap and filter/regulator, as well as an additional
tap with quick-disconnect fitting for any possible future
needs. I had to extend all lower wall electrical, phone,
and cable TV outlets into the cabinets themselves, and then
ran electrical outlet extensions along the countertops.
I trimmed out all plywood cabinets with various oak and pine
trim pieces, which did much to improve the overall appearance.
For the crown molding, I trimmed each plywood edge with a
pine 1x3 stringer, and then installed the unfinished pine
crown molding pieces with my electric nail gun. I had
to build a notch around the room's smoke detector, since it
was not easily moved (due to being tied into my home's alarm
system).
Various storage and detail items have yet to be added, and
photos will undoubtedly be posted here once available/completed.
The closet will also be redone, and feature floor-ceiling
storage shelving.
Click on photos below for online slideshows of my hobby workshop
room construction: |
April - May 2006 |
June 2006 |
July 2006 |
August 2006 |

September
2006 -
June 2007 |
|
November-December 2007 |
December 2007 |
|
|
|
| |
|
|
|
|
|
GARAGE WORKSHOP CONSTRUCTION
& FABRICATION |
Once the hobby workshop above
was constructed to the point where only finishing details
were left (countertops, air pressure lines, electrical extensions
& outlets), my wife and I decided to get started on our
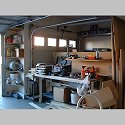
garage workshop. This was necessary to house my "heavy
machinery": bandsaw, drill presses, welders, air compressor
with air tools, and lathe. We specifically bought our
new home with a 3-car garage, so I could convert the 3rd car
parking area into my workshop. In the summer of 2006,
I lucked into the purchase of 700 pounds of 5/8-inch particle
board remnants from a custom cabinet job at a local lumber
store; these remnants were all 18-24 inches wide and mostly
6 or 8 feet long (there were also several 10-foot long sections).
I believed that these would be a perfect starting point for
the garage workshop, as I could fishplate (boilerplate) the
particle boards together for strength. The price was
irresistible, only $75! I loaded all 700 pounds into
my truck and carted it home for when construction could begin.
I started by laying down steel studs (2x4 size) on the ground
in the area I wanted to start building my main workbench,
in case water flooded our garage to prevent destruction of
the particle board. This proved wise, as within a month
our garage-located hot water heater blew up, flooding the
garage with water. Luckily, the metal studs on the bottom
prevented any damage to the now-extensive main workbench framework,
and I only lost 2 or 3 sheets of particle board overall (not
bad, considering!). I purchased some full-size sheets
of particle board to put up a wall between the 3rd car portion
of the garage and the main parking area of the garage, to
keep dust, debris, and other nasties off our vehicles parked
inside. Against this reinforced wall, I started framing
out the workbench. I laid down 4 layers of fishplated
particle board for the floor of the workbench, screwed and
bolted together, then began installing the frame for the main
workbench. The overall dimensions of the main workbench
are 3-feet wide by 11-feet long, to provide the maximum workable
counterspace possible along with maximum storage space beneath.
For the crossmembers, I again fishplated 3 layers of particle
board together, all screwed &bolted together. Reinforcement
is provided by 2x2 stringers, which also provide mounting
surfaces for the heavy-duty roller-bearing drawer sliders.
For the cabinet doors, I used 4 European concealed hinges
per door. I constructed the drawer & cabinet facings
from particle board, and glued on pine trim strips all around
for visual appeal.
The top consists of 3 layers of particle board, screwed and
bolted together, and the same goes for the front and side
facings. I finished off the basic construction by screwing
on strips of 1-1/2 inch slotted angle steel to the top edges
all the way around, to protect the particle board edges.
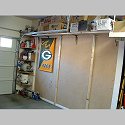
All bare wood was primed, sealed, and painted. Since
I am a huge NFL San Diego Chargers fan, I just had to paint
the workshop in the Chargers' colors (Navy Blue, Gold, White,
and portions of the wall in "throwback/retro" Powder
Blue). Much detail painting remains to be done, including
the opposite side of the workshop wall facing the main parking
area which will be painted to resemble a football field. |
February - May 2007 |
June
2007 |
|
|
|
| |
|
|
|
|
|
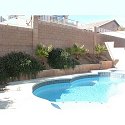
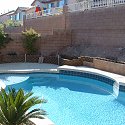
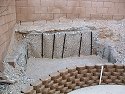
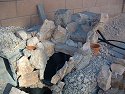
OUTDOOR GARDEN RAILWAY CONSTRUCTION |
November 2005 |

December 2005 |
Dec 2005 - Jan 2006 |
January 2006 |
February 2006 |
| |
|
|
|
|
|
|
Silver State Specialties was created in 1999 to offer quality resin
accessories, replacement parts and conversion kits, suitable for
many 1/25-scale plastic model kits. SSS specializes in accessories
and parts for plastic model pickup, SUV, 4x4, and heavy truck &
trailer kits. 1/32-scale and 1/35-scale parts and accessories
will be available in the future for model truck kits, such as the
1/32 Monogram Snap-Tite and ERTL snap-together kits, as well as
1/35-scale Revell, Italeri, AFV Club, Trumpeter, Airfix, Heller,
Tamiya, and other military model truck kits. Some of these
smaller scale model kits are quite well detailed, and a wide variety
of photo-etched, resin, and other accessories are widely available
for most of these military truck model kits. What's even more exciting
is the line of 1/24th & 1/25th-scale military model kits and
conversions we are in the early stages of developing, to nicely
compliment your ERTL, AMT, Italeri, Revell, and other brands of
truck models.
Silver State Specialties is working on resin accessories and complete
kits for G- gauge outdoor garden railway trains ("Large Scale")
in 1/24th-scale. Some patterns have been completed, and many more
are under construction. These kits and accessories will include
complete Beyer-Garratt style of locomotives and Narrow Gauge ore
hopper cars, as well as 24-inch & 30-inch gauge industrial equipment
in this same scale.
SSS also has master patterns partially completed for many 1/16-scale
model truck accessories and conversion kits, mainly for the Monogram-Revell
1/16-scale model truck kits. Some projected accessories for
these 1/16-scale kits are front drive axles, different wheels and
tires, air cleaner accessories, pusher and tag axles, oil filters
and engine accessories, and possibly different engines. Cab
& hood conversion kits remain a possibility for these monsters
as well, but are still years away from being offered as there are
more pressing projects to push forward with first. But someday
they should be available!
Thank you for your continued support, your loyal business, and your
patience with us!
|
|
|